Roger G.R.O.S (General repository of Stuff)
Rogers WP Site of Stuff
James KiarieAugust 11, 2022 Categories Apache, RedHat, WordPress2 Comments
WordPress is an immensely popular CMS (Content Management System) that accounts for nearly 43% of all the websites according to W3techs.com.
From powering high-traffic sites such as eCommerce, and news websites to simple blogs, WordPress has remained on top of the perch among its competitors such as Joomla, Shopify, and Wix.
WordPress is open source, and free to use. It provides tons of customizations to help you build anything you want. It allows you to build high-performance, SEO-friendly sites which are mobile responsive and easy to customize.
In this guide, we will demonstrate how to install WordPress on RHEL 8 with an Apache webserver.
Before getting started, ensure that Apache, MariaDB, and PHP are installed on RHEL 8, which collectively comprise the LAMP stack.
The latest version of WordPress requires PHP 7.4 or higher. The default AppStream repository only provides PHP 7.2 which is insecure and no longer supported. You can install the latest PHP version using the Remi repository instead. With the requirements out of the way, let us get started!
We will begin by creating the database for the WordPress installation, which is used to store all the files during and after the installation.
So, log in to the MariaDB database:
$ sudo mysql -u root -p
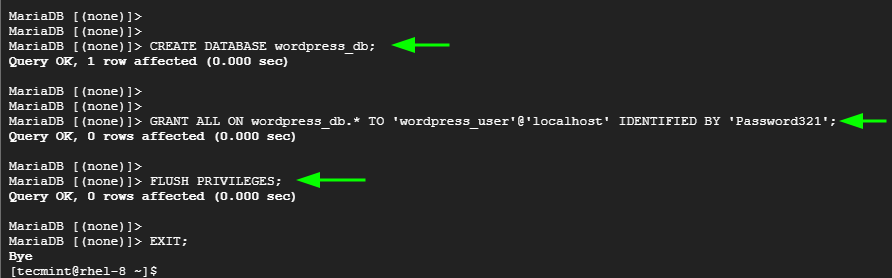
Once on the MariaDB shell, create the database and database user and grant all the privileges to the database user.
CREATE DATABASE wordpress_db;
GRANT ALL ON wordpress_db.* TO 'wordpress_user'@'localhost' IDENTIFIED BY 'StrongPassword';
Save the changes and exit the MariaDB prompt.
FLUSH PRIVILEGES;
exit;
With the WordPress database in place, the next course of action is to download and configure WordPress. At the time of publishing this guide, the latest WordPress version is 5.9.1.
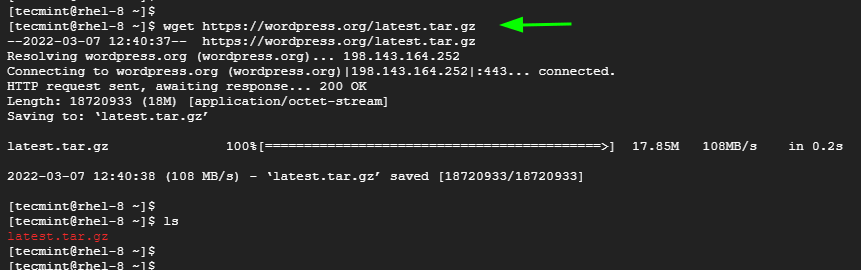
To download WordPress, use the wget command to download the binary file from the official site.
$ wget https://wordpress.org/latest.tar.gz
Next, extract the tarball file:
$ tar -xvf latest.tar.gz
Next, we are going to copy the wp-config-sample.php file to wp-config.php from where WordPress derives its base configuration. To do that run.
$ cp wordpress/wp-config-sample.php wordpress/wp-config.php
Next, edit the wp-config.php file.
$ vi wordpress/wp-config.php
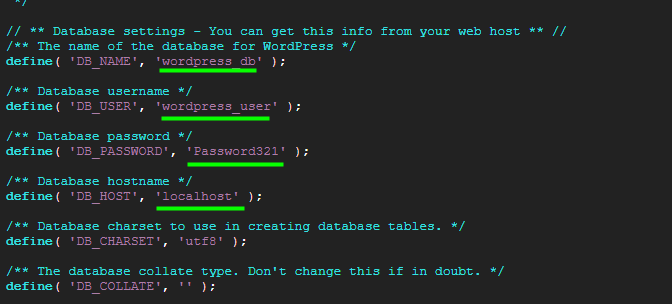
Modify the values to correspond to your database name, database user, and password as indicated in the image shown.
Save the changes and exit the configuration file.
Next, copy the WordPress directory to the document root.
$ sudo cp -R wordpress /var/www/html/
Be sure the assign the necessary directory ownership and permissions as follows:
$ sudo chown -R apache:apache /var/www/html/wordpress
$ sudo chcon -t httpd_sys_rw_content_t /var/www/html/wordpress -R
$ sudo chmod -Rf 775  /var/www/html
We also need to create a configuration file for WordPress in order to point client requests to the WordPress directory. We will create the configuration file as shown
$ sudo vi /etc/httpd/conf.d/wordpress.conf
Copy and paste the lines below to the configuration file.
<VirtualHost *:80>
ServerAdmin admin@localhost
DocumentRoot /var/www/html/wordpress

<Directory "/var/www/html/wordpress">
Options Indexes FollowSymLinks
AllowOverride all
Require all granted
</Directory>

ErrorLog /var/log/httpd/wordpress_error.log
CustomLog /var/log/httpd/wordpress_access.log common
</VirtualHost>
Save and exit the configuration file.
To apply the changes, restart Apache.
$ sudo systemctl restart httpd
In most cases, RHEL 8 comes with SELinux enabled. This can be a hindrance, especially during the installation of web applications. As such, we need to configure the right SELinux context to the /var/www/html/wordpress directory.
$ sudo semanage fcontext -a -t httpd_sys_rw_content_t "/var/www/html/wordpress(/.*)?"
For the changes to come into effect, execute:
$ sudo restorecon -Rv /var/www/html/wordpress
Then reboot your system.
NOTE: Before you reboot, ensure that Apache and MariaDB services are enabled so that they can start automatically on boot.
$ sudo systemctl enable httpd
$ sudo systemctl enable mariadb
The last step is to complete the installation from a web browser. Launch your browser and browse your server’s IP address:
http://server-IP-address
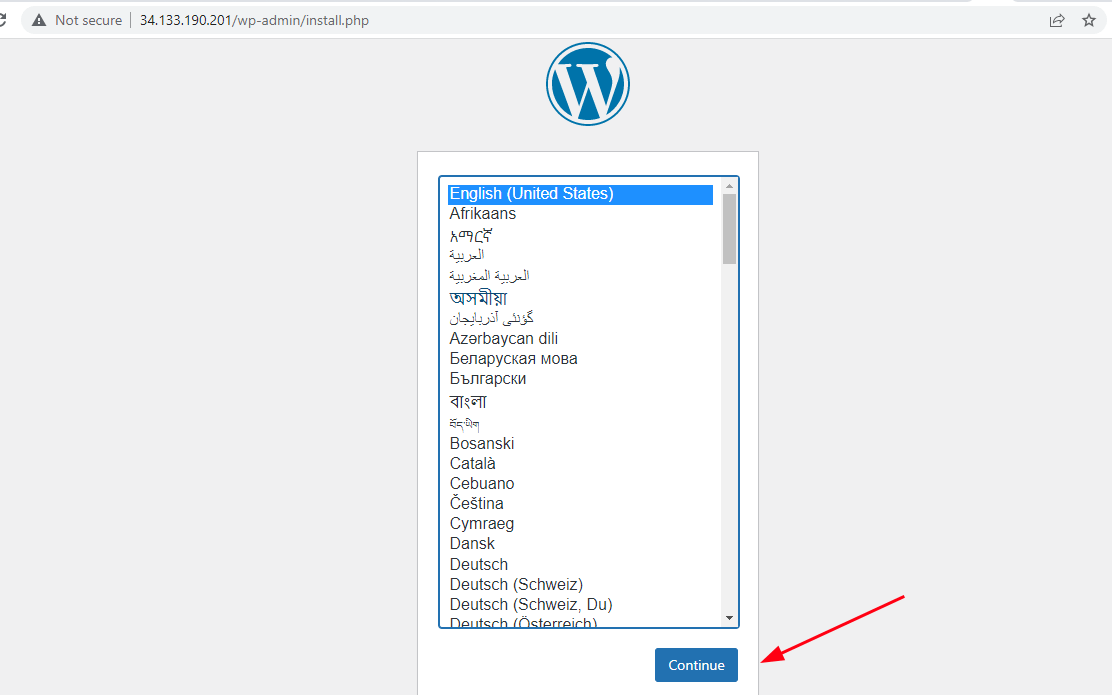
On the first page, select your preferred installation language and click ‘Continue’.
In the next step, fill in your Site’s details.
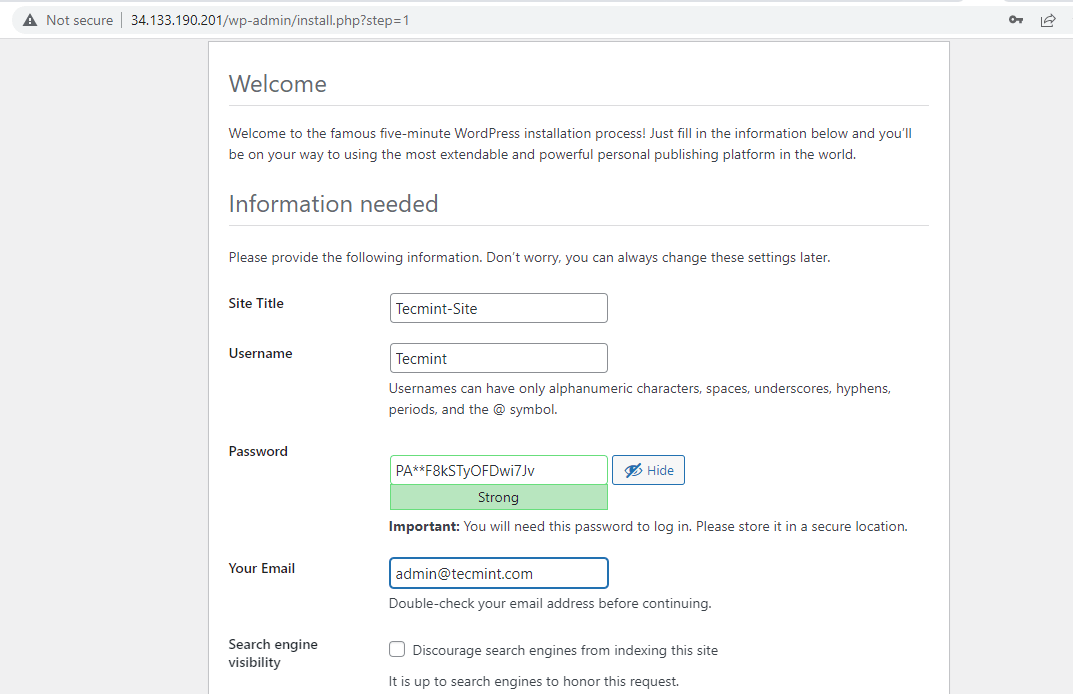
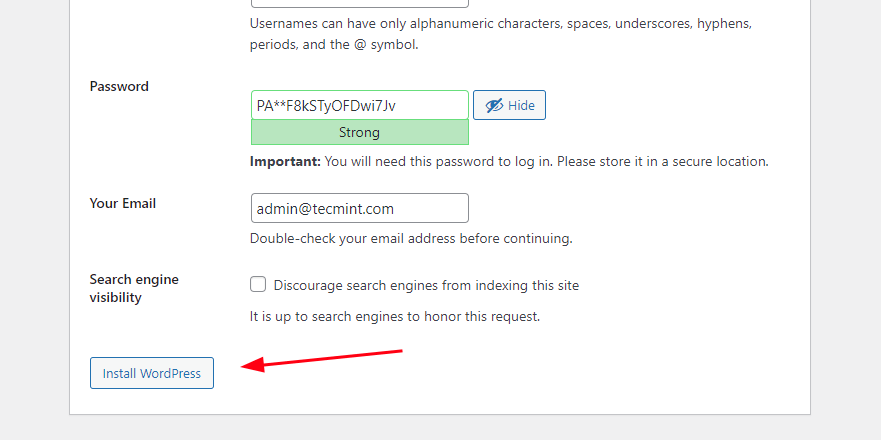
Then scroll down and click ‘Install WordPress’.
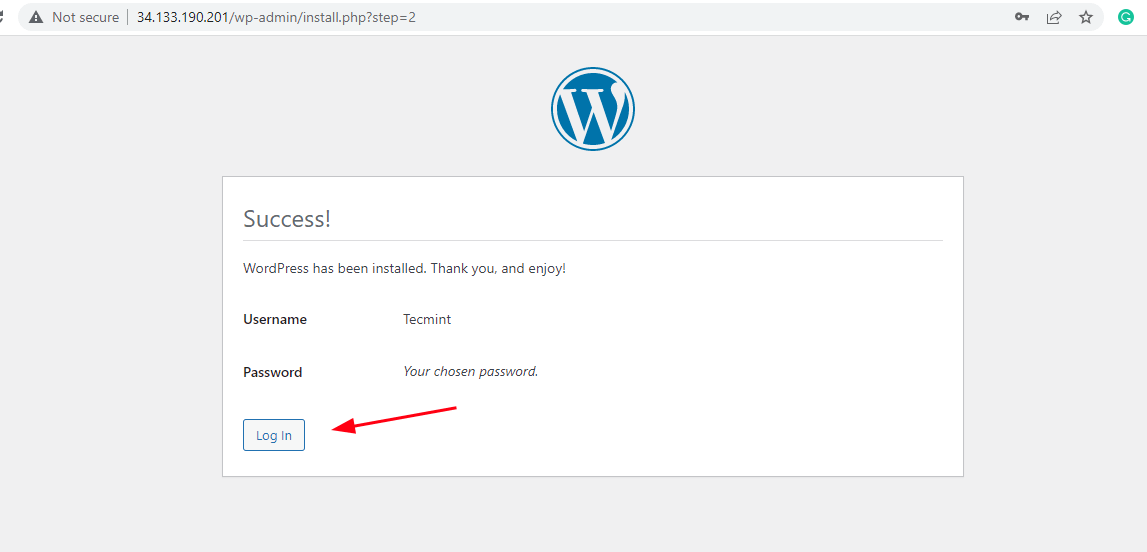
And in flash, WordPress installation will be complete! To log in, click the ‘Login’ button.
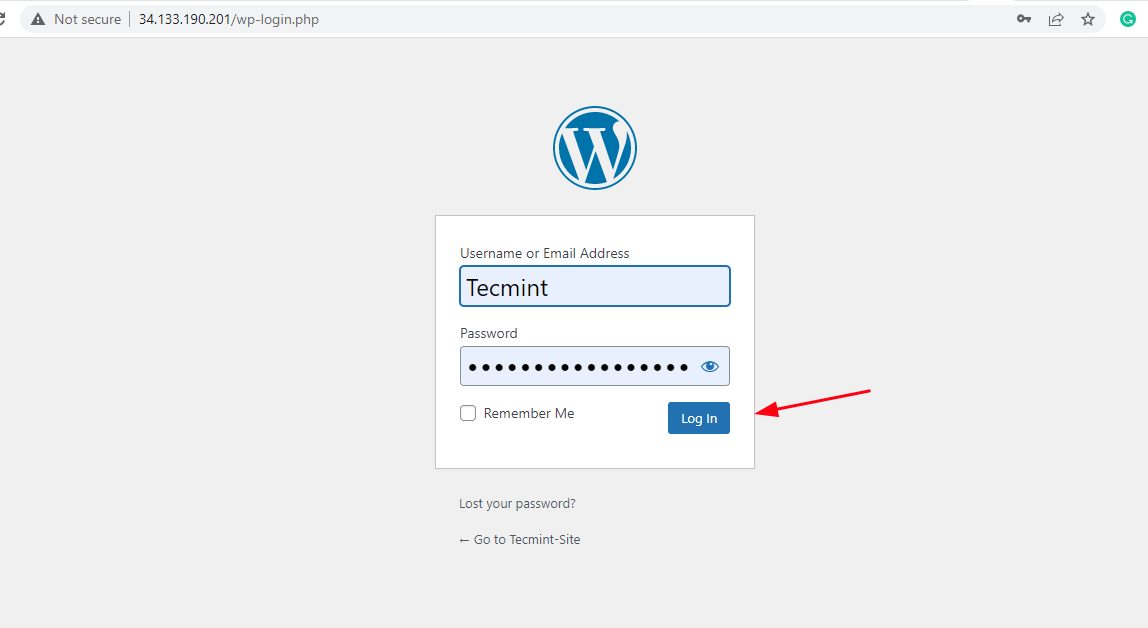
On the login screen, provide the username and password and click ‘Log In‘.
This ushers you to the WordPress dashboard as shown. From here, you can customize your website with rich and elegant themes and plugins.
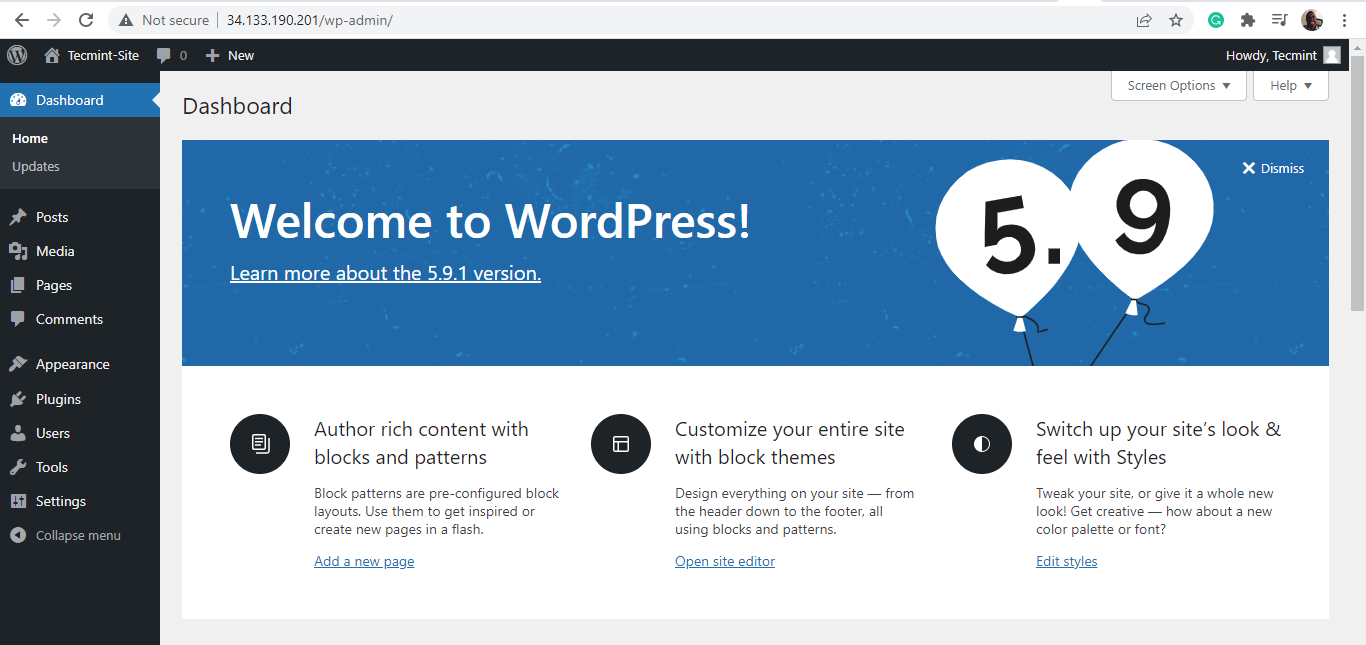
And that’s it! You have successfully installed WordPress on RHEL 8.
Welcome to WordPress. This is your first post. Edit or delete it, then start writing!
Protect against phishing & prevent messages from being marked as spam
This article is for IT professionals and people who have experience setting up email servers. It has technical information about SPF, including SPF record requirements, SPF record syntax, and how SPF affects email delivery. For a basic SPF record for sending email with Google Workspace only, or for Google Workspace plus your other email senders, follow the instructions in Define your SPF record—Basic setup.
An SPF record defines the mail servers and domains that are allowed to send email on behalf of your domain. It also tells receiving servers what to do with messages after they’re checked. Receiving servers check your SPF record to verify that incoming messages that appear to be from your organization are sent from servers authorized by you. Domains can have one SPF record. However, the SPF record for a domain can specify multiple servers and third parties that are allowed to send email for the domain.
An SPF record is a line of plain text that includes a list of tags and values. The tags are called mechanisms. The values are typically IP addresses and domain names.
An SPF record is added to your domain provider in the form of a DNS TXT record. Learn more About DNS TXT records.
SPF records can have up to 255 characters. The TXT record file size should be no larger than 512 bytes.
Use the mechanisms in this table to create your SPF record. Receiving mail servers check messages against mechanisms in the order they are listed in the SPF record.
Keep in mind:
| Mechanism | Description and allowed values |
|---|---|
v | SPF version. This tag is required, and must be the first tag in the record. This mechanism must be: v=spf1 |
ip4 | Authorize mail servers by IPv4 address or address range. The value must be an IPv4 address or range in standard format, for example: ip4:192.168.0.1 or ip4:192.0.2.0/24 |
ip6 | Authorize mail servers by IPv6 address or address range. The value must be an IPv6 address or range in standard format, for example: ip6:3FFE:0000:0000:0001:0200:F8FF:FE75:50DF or ip6:2001:db8:1234::/48 |
a | Authorize mail servers by domain name, for example: a:solarmora.com |
mx | Authorize one or more mail servers by domain MX record, for example: mx:mail.solarmora.com If this mechanism isn’t in your SPF record, the default value is the MX records of the domain where the SPF record is used. |
include | Authorize third-party email senders by domain, for example: include:servers.mail.net |
all | Specifies that all incoming messages match. We recommend you always include this mechanism in your SPF record. This must be the last mechanism in the SPF record. Any mechanism that comes after the all mechanism in an SPF record is ignored. Should I use ~all or -all? When an SPF record includes ~all (softfail qualifier), receiving servers typically accept messages from senders that aren’t in your SPF record, but mark them as suspicious. When an SPF record includes -all (fail qualifier), receiving servers may reject messages from senders that aren’t in your SPF record. If your SPF record isn’t set up correctly, the fail qualifier might cause more messages from your domain to be sent to spam. Tip: To prevent spoofing of domains that don’t send email, use this as the SPF record for the domain: vspf1 ~all |
A qualifier is an optional prefix you can add to any mechanism in your SPF record. Qualifiers tell the receiving mail server whether to consider a message authenticated when there’s a match with a mechanism value, for example:
v=spf1 include:_spf.google.com -all In this example, the SPF record authorizes only Google Workspace to send emails for your domain. The all mechanism has a fail qualifier ( – ), so messages from any other senders fail the SPF check and may be rejected by the receiving server.
Mechanisms are checked in the order they occur in the SPF record. If a mechanism doesn’t have a qualifier and there’s a match, the default action is pass authentication. When there’s no mechanism match, the action default is neutral: the message doesn’t pass or fail authentication.
Use these optional qualifiers to tell receiving mail servers how to handle messages that match mechanisms in the SPF record.
After you’ve created the SPF record for your domain, add your SPF record at your domain provider.
Postfix is an alternative to the widely used Sendmail Message Transfer Agent (MTA). For information about Postfix, go to http://www.postfix.org
. The procedures in this topic will work with Linux, macOS, or Unix. Note
Postfix is a third-party application, and isn’t developed or supported by Amazon Web Services. The procedures in this section are provided for informational purposes only, and are subject to change without notice.
Before you complete the procedures in this section, you have to perform the following tasks:
cyrus-sasl-plain package. If you use a Debian- or Ubuntu-based system, you should install the libsasl2-modules package.Complete the following procedures to configure your mail server to send email through Amazon SES using Postfix.
To configure Postfix
sudo postconf -e "relayhost = [email-smtp.us-west-2.amazonaws.com]:587" \
"smtp_sasl_auth_enable = yes" \
"smtp_sasl_security_options = noanonymous" \
"smtp_sasl_password_maps = hash:/etc/postfix/sasl_passwd" \
"smtp_use_tls = yes" \
"smtp_tls_security_level = encrypt" \
"smtp_tls_note_starttls_offer = yes"
Note
If you use Amazon SES in an AWS Region other than US West (Oregon), replace email-smtp.us-west-2.amazonaws.com in the preceding command with the SMTP endpoint of the appropriate region. For more information, see Regions and Amazon SES.
In a text editor, open the file /etc/postfix/master.cf. Search for the following entry:
-o smtp_fallback_relay=If you find this entry, comment it out by placing a # (hash) character at the beginning of the line. Save and close the file.
Otherwise, if this entry isn’t present, proceed to the next step.
In a text editor, open the file /etc/postfix/sasl_passwd. If the file doesn’t already exist, create it.
Add the following line to /etc/postfix/sasl_passwd:
[email-smtp.us-west-2.amazonaws.com]:587 SMTPUSERNAME:SMTPPASSWORDNote
Replace SMTPUSERNAME and SMTPPASSWORD with your SMTP username and password, respectively. Your SMTP user name and password aren’t the same as your AWS access key ID and secret access key. For more information about credentials, see Obtaining your Amazon SES SMTP credentials.
If you use Amazon SES in an AWS Region other than US West (Oregon), replace email-smtp.us-west-2.amazonaws.com in the example above with the SMTP endpoint of the appropriate region. For more information, see Regions and Amazon SES.
Save and close sasl_passwd.
At a command prompt, type the following command to create a hashmap database file containing your SMTP credentials:
sudo postmap hash:/etc/postfix/sasl_passwd(Optional) The /etc/postfix/sasl_passwd and /etc/postfix/sasl_passwd.db files you created in the previous steps aren’t encrypted. Because these files contain your SMTP credentials, we recommend that you modify the files’ ownership and permissions in order to restrict access to them. To restrict access to these files:
sudo chown root:root /etc/postfix/sasl_passwd /etc/postfix/sasl_passwd.dbAt a command prompt, type the following command to change the permissions of the files so that only the root user can read or write to them:
sudo chmod 0600 /etc/postfix/sasl_passwd /etc/postfix/sasl_passwd.dbTell Postfix where to find the CA certificate (needed to verify the Amazon SES server certificate). The command you use in this step varies based on your operating system.
sudo postconf -e 'smtp_tls_CAfile = /etc/ssl/certs/ca-bundle.crt'If you use Ubuntu or a related distribution, type the following command:
sudo postconf -e 'smtp_tls_CAfile = /etc/ssl/certs/ca-certificates.crt'If you use macOS, you can generate the certificate from your system keychain. To generate the certificate, type the following command at the command line:
sudo security find-certificate -a -p /System/Library/Keychains/SystemRootCertificates.keychain > /etc/ssl/certs/ca-bundle.crtAfter you generate the certificate, type the following command:
sudo postconf -e 'smtp_tls_CAfile = /etc/ssl/certs/ca-bundle.crt'Type the following command to start the Postfix server (or to reload the configuration settings if the server is already running):
sudo postfix start; sudo postfix reloadSend a test email by typing the following at a command line, pressing Enter after each line. Replace sender@example.com with your From email address. The From address has to be verified for use with Amazon SES. Replace recipient@example.com with the destination address. If your account is still in the sandbox, the recipient address also has to be verified. Finally, the final line of the message has to contain a single period (.) with no other content.
sendmail -f sender@example.com recipient@example.com From: Sender Name <sender@example.com> Subject: Amazon SES Test This message was sent using Amazon SES. ./var/log/maillog) for more information.This example shows how to send an email that uses a configuration set, and that uses MIME-multipart encoding to send both a plain text and an HTML version of the message, along with an attachment. It also includes a link tag, which can be used for categorizing click events. The content of the email is specified in an external file, so that you do not have to manually type the commands in the Postfix session.
To send a multipart MIME email using Postfix
mime-email.txt.X-SES-CONFIGURATION-SET: ConfigSet
From:Sender Name <sender@example.com>
Subject:Amazon SES Test
MIME-Version: 1.0
Content-Type: multipart/mixed; boundary="YWVhZDFlY2QzMGQ2N2U0YTZmODU"
--YWVhZDFlY2QzMGQ2N2U0YTZmODU
Content-Type: multipart/alternative; boundary="3NjM0N2QwMTE4MWQ0ZTg2NTYxZQ"
--3NjM0N2QwMTE4MWQ0ZTg2NTYxZQ
Content-Type: text/plain; charset=UTF-8
Content-Transfer-Encoding: quoted-printable
Amazon SES Test
This message was sent from Amazon SES using the SMTP interface.
For more information, see:
http://docs.aws.amazon.com/ses/latest/DeveloperGuide/send-email-smtp.html
--3NjM0N2QwMTE4MWQ0ZTg2NTYxZQ
Content-Type: text/html; charset=UTF-8
Content-Transfer-Encoding: quoted-printable
<html>
<head>
</head>
<body>
<h1>Amazon SES Test</h1>
<p>This message was sent from Amazon SES using the SMTP interface.</p>
<p>For more information, see
<a ses:tags="samplekey0:samplevalue0;samplekey1:samplevalue1;"
href="http://docs.aws.amazon.com/ses/latest/DeveloperGuide/send-email-smtp.html">
Using the Amazon SES SMTP Interface to Send Email</a> in the <em>Amazon SES
Developer Guide</em>.</p>
</body>
</html>
--3NjM0N2QwMTE4MWQ0ZTg2NTYxZQ--
--YWVhZDFlY2QzMGQ2N2U0YTZmODU
Content-Type: application/octet-stream
MIME-Version: 1.0
Content-Transfer-Encoding: base64
Content-Disposition: attachment; filename="customers.txt"
SUQsRmlyc3ROYW1lLExhc3ROYW1lLENvdW50cnkKMzQ4LEpvaG4sU3RpbGVzLENh
bmFkYQo5MjM4OSxKaWUsTGl1LENoaW5hCjczNCxTaGlybGV5LFJvZHJpZ3VleixV
bml0ZWQgU3RhdGVzCjI4OTMsQW5heWEsSXllbmdhcixJbmRpYQ==
--YWVhZDFlY2QzMGQ2N2U0YTZmODU--Save and close the file.
At the command line, type the following command. Replace sender@example.com with your email address, and replace recipient@example.com with the recipient’s email address.
sendmail -f sender@example.com recipient@example.com < mime-email.txt If the command runs successfully, it exits without providing any output.| For information and discussions about a variety of topics related to Amazon SES, see the AWS Messaging and Targeting Blog |
. To browse and post questions, go to the Amazon SES Forum.
The information below must be added to your domain’s DNS records. How you update the DNS settings depends on who provides your DNS service; if your DNS service is provided by a domain name registrar, please contact that registrar to update your DNS records. Learn more
| DKIM: | waiting on DKIM verification… |
| DKIM Verification Status: | pending verification |
To enable DKIM signing for your domain, the records below must be entered in your DNS settings. AWS will automatically detect the presence of these records, and allow DKIM signing at that time. Note that verification of these settings may take up to 72 hours.
| Name | Type | Value |
|---|
| pe5ogj47kvbsmilvvxh5fiajyxom3b5b._domainkey.rogerj228.com | CNAME | pe5ogj47kvbsmilvvxh5fiajyxom3b5b.dkim.amazonses.com |
| qtgljgfyuy5pbgo6wktezinruwvljvod._domainkey.rogerj228.com | CNAME | qtgljgfyuy5pbgo6wktezinruwvljvod.dkim.amazonses.com |
| konmkzlnvy2zmwmagjmnnuimp62ixut4._domainkey.rogerj228.com | CNAME | konmkzlnvy2zmwmagjmnnuimp62ixut4.dkim.amazonses.com |
n part 4 of building your own email server tutorial series (Ubuntu version, CentOS/RHEL version), we implemented SPF and DKIM records to improve email deliverability. In this part, we’re going to look at another email authentication technology: DMARC. We will discuss how DMARC can benefit you, how to create DMARC record and interpret DMARC report.
DMARC stands for Domain-based message authentication, reporting and conformance. DMARC is not a product. It’s a freely available technical specification and widely supported across the Internet. Anyone owning a domain name can take advantage of DMARC.
A DMARC policy allows a domain owner to indicate that emails from his/her domain is protected by SPF and DKIM. You can use DMARC to discover all legitimate sources of email. DMARC builds upon two existing technologies: SPF and DKIM.
Why is DMARC good for you? The benefits of deploying DMARC are:
From: header address to impersonate big brands. DMARC is a powerful tool to fight against email phishing and thus protect your brand.This is a pretty big deal to any organization that relies on email for its day-to-day business. If you are doing email marketing, then DMARC is a must-have tool to make email easy to deliver and reach customers. Pretty much every major consumer-facing mailbox provider like Gmail, Yahoo and Microsoft ask to be sent DMARC-compliant email to make their job of filtering emails easier.
DMARC policies are published as a TXT record in DNS.
Before creating a DMARC record, you must create SPF and DKIM records first.
Send a test email from your domain, then check the raw email headers at the recipient’s mailbox. You want to make sure the domains in Return Path, From: header and d=domain in the DKIM signature are the same. If the 3 domains are identical, then they are aligned.
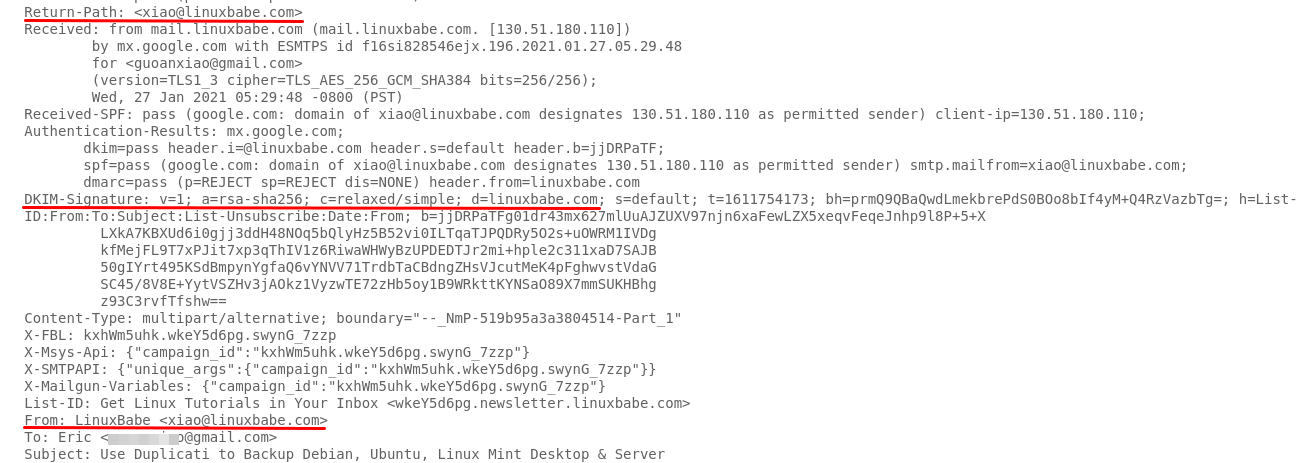
If Return-Path or DKIM d= uses a subdomain instead of the main domain name, then this is called relaxed alignment. If no subdomain is used and the main domain names are the same, it’s called strict alignment.
Go to your DNS manager and add a TXT record. In the name field, enter _dmarc. In the value field, enter the following:
v=DMARC1; p=none; pct=100; rua=mailto:dmarc-reports@your-domain.com
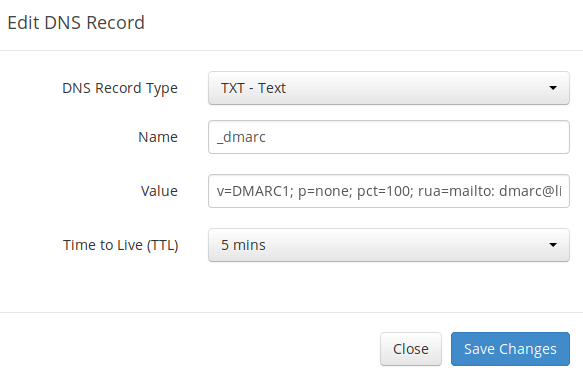
Explanation:
v=DMARC1: The protocol version is DMARC1.p=none: We choose none as the policy for our domain.pct=100: The percentage of emails from your domain DMARC applies torua stands for reporting URI for aggregate report. The email address is used to tell receiving email servers where report should be sent. Replace dmarc-reports@your-domain.com with your real email address that is used to receive aggregate DMARC report.There are 3 policies you can choose from:
none: tells receiving email servers not to do anything special if DMARC check fails.quarantine: tells receiving email server to put the email into spam folder if DMARC check fails.reject: tells receiving email servers to reject the email if DMARC check failsp=none is a good start. You should analyze the data for some time. Once you have enough data, you can change the policy from none to quarantine or reject.
There’s another tag that you can add to the DMARC record: fo. It has four possible values.
0 (default): generate reports if all underlying authentication mechanisms fail to produce a DMARC pass result1: generate reports if any mechanisms fail.d: generate a report if DKIM signature failed verification.s: generate a report if SPF failedI recommend using fo=1 first to generate more comprehensive DMARC failure reports. When you change to a more restrictive policy, use fo=0.
v=DMARC1; p=none; pct=100; fo=1; rua=mailto:dmarck-reports@your-domain.com
You can check your DMARC record from Linux terminal with the following command:
dig txt +short _dmarc.example.com

You can see that I used two email addresses to receive DMARC report, which I will explain later. There’s another command-line tool (opendmarc-check) that you can use to check DMARC record. It’s provided by the opendmarc package.
sudo apt install opendmarc
opendmarc-check queries the DNS for a DMARC record for the named domain and then translates the content found to a human-readable form.
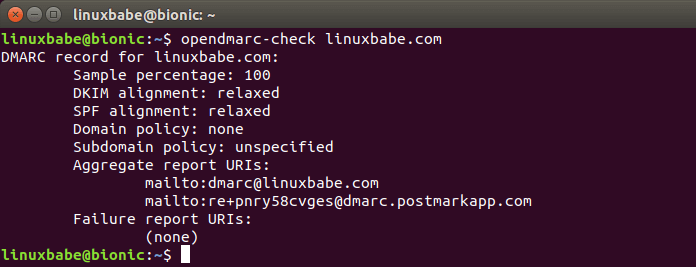
If you have a domain name that’s not going to send emails, you should use p=reject policy.
v=DMARC1; p=reject; pct=100;
A good service for DMARC test is https://www.mail-tester.com. Go to the website, you will see a unique email address. Send an email from your domain to this address and then check your score. (This website check all factors that affect email deliverability, not just DMARC.) If DMARC passes, then you will see something like below in the test result.

Another way to test DMARC is send an email from your domain to your Gmail account. If DMARC is configured correctly then you will see dmarc=pass in the authentication-results header. (To view email headers in Gmail, click the Show Original button, which can be found in the drop-down menu on the right side of an opened email.)

To pass DMARC check, your emails need to meet one of the following requirements.
Return-Path: domain name is the same as the From: header domain.d= domain in DKIM signature is the same as the From: header domain.By default, DMARC uses relaxed alignment. So the Return-Path domain or the d= domain in DKIM signature can be a subdomain.
There are two kinds of DMARC reports.
Normally you only want to receive the aggregate report. The data that DMARC produces is invaluable for understanding what is going on for any given email domain. However, raw DMARC report data is super hard to read and understand. Luckily, Postmark offers a free service to process these reports, presents you a much more readable report. The nice part about Postmark is that you can tell receiving email servers to send XML reports directly to Postmark for processing. So instead of entering your email address in the DMARC record, you enter an email address of postmarkapp.com that is unique to you.
v=DMARC1; p=none; pct=100; fo=1; rua=mailto:unique-to-you@dmarc.postmarkapp.com;
You can also specify multiple email addresses, separated by commas.
v=DMARC1; p=none; pct=100; fo=1; rua=mailto:unique-to-you@dmarc.postmarkapp.com,mailto:dmarc-report@your-domain.com;
After your DMARC record has been verified by Postmark, you will receive a DMARC report weekly every Monday in your email inbox. You don’t need to register an account at Postmark.
Below is my first weekly report sent from Postmark. mcsignup.com belongs to MailChimp, which is what I use to send newsletters to my mailing list. In my SPF record, I actually allow MailChimp to send emails on my behalf, but I didn’t know that they don’t use my domain name in the Return-Path header for the signup confirmation emails. And they don’t sign emails using my DKIM domain.

There’s also an unknown source that claims to be linuxbabe.com.
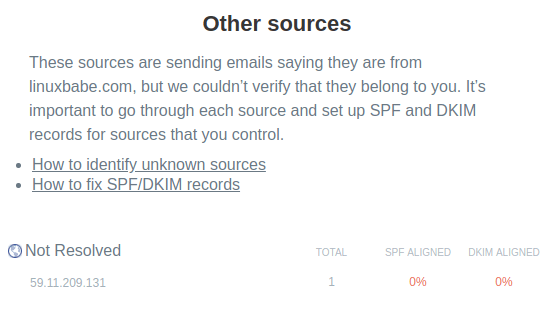
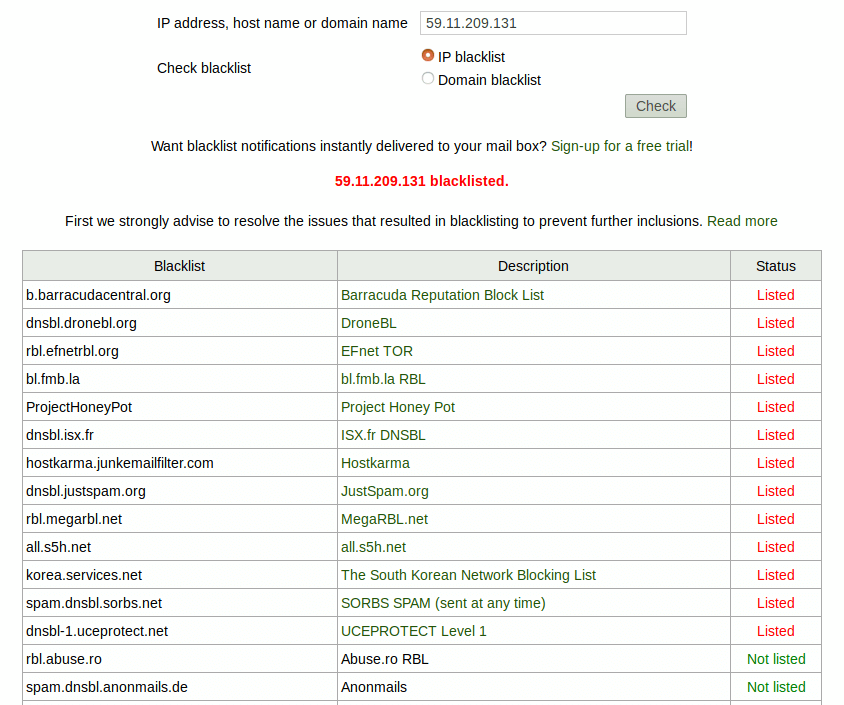
First, I always treat IP address that doesn’t have reverse DNS record as spam. Then, to identify other unknown sources, I will check if it’s on an email blacklist. debouncer.com tells me that it’s on 13 blacklists. So clearly it’s a spammer trying to impersonate my domain name.
To better understand the unknown source and how your domains are used, you can choose to receive forensic report by adding the ruf tag in DMARC record like below.
v=DMARC1; p=none; pct=100; fo=1; rua=mailto:unique-to-you@dmarc.postmarkapp.com; ruf=mailto:forensic-report@your-domain.com;
The forensic report contains the copies of emails that failed DMARC check. You can see the email headers, subject lines, and sometimes message body to determine the nature of failed emails. If you recognize the subject line, then it’s more likely to be a forwarded message. Note that some email servers may choose to generate aggregate reports but not forensic report due to privacy concerns and others may only include email headers in the forensic report.
A typical example of SPF failure is when your emails are relayed to the destination email server through a third-party server. And the common situation where DKIM fails is when your emails are sent through a mailing list, which often adds additional headers or sentences to your emails. Actually, a mailing list can cause SPF failure too.
There are two kinds of mailing lists.
This first kind is easy to tackle because the domain owner is a customer of the mailing list server provider. It’s easy to add the mailing list server to SPF record. Also, the mailing listing server can do DKIM signing for customers.
The second kind of mailing list is difficult to tackle for domain owners who have users participating in discussions in various mailing lists. The domain owner can’t list all possible discussion mailing list servers in SPF record, and these mailing lists can’t do DKIM signing for other domain names. A possible solution is that the mailing list uses its own address in the From: header, and adds the original email sender’s address in the Reply-To: header. More details can be found on this GNU mailman wiki page. A more practical and promising solution is ARC (Authentication Received Chain), which basically means that mailing lists do DMARC check and sign the DMARC result. Receiving email servers can trust the ARC signature and override local DMARC check results.
You should wait enough time to receive lots of DMARC report. Don’t be surprised when you see false positives in your DMARC report. Analyze these false positives and take action to make sure they can pass DMARC check. After that, switch your DMARC policy to p=quarantine and eventually p=reject. Do not skip quarantine and go straight to reject. When you switch to a more strict DMARC policy, consider changing the value of pct tag.
So the overall process goes like this:
Firstly, it’s because of Microsoft. mails forwarded from Microsoft Outlook Mailbox can fail DKIM check, which is bad. For this reason, I cannot set my DMARC policy to quarantine or reject.
Another reason is that I’m using MailChimp to send newsletters to my email subscribers. MailChimp uses its own domain in the Return-Path header and its own DKIM signature for the signup confirmation email, which causes DMARC failure.
The solution to the first problem is deplopying ARC (Authenticated Received Chain). Until ARC is implemented on Mailbox providers, I won’t change my DMARC policy.
To solve the second problem, I need to switch to a self-hosted newsletter app like Mailtrain, instead of using an email service provider (ESP) to send newsletters to email subscribers. That way, I can use my own domain name in the Return-Path header and my own DKIM signature in every email. However, this also means I will need to build a good reputation for my email domain and the IP address of my email server so that my emails can land in my subscribers’ inbox instead of the spam folder. That can take some time and effort.
DKIM alignment in emails forwarded by Microsoft Outlook has improved. Also in February 2019, Mailchimp started using the customer’s domain name in the DKIM signature for the signup confirmation emails, so all Mailchimp emails are now DKIM-aligned. I now begin experimenting with the p=quarantine policy and eventually will switch to the p=reject policy.
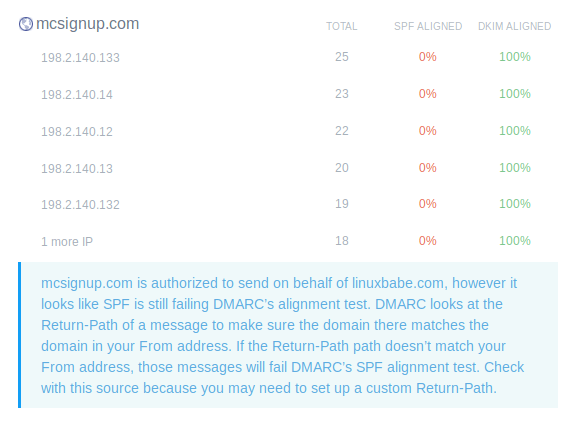
Having a p=none policy is better than having no DMARC record. Although p=none cannot prevent email spoofing, at least my legitimate emails have a better chance to be placed in inbox.
I hope this article helped you understand and deploy DMARC policy. In part 6, I will share with you all my tips on how to get your emails into the recipient’s inbox instead of the spam folder.
fter completing part 1 and part 2, we have a working Postfix SMTP server and Dovecot IMAP server. We can send and receive email using a desktop email client. Although I have created correct MX, A and PTR record, my emails were flagged as spam by Gmail and Outlook mail. So in this part, we are going to look at how to improve email delivery to recipient’s inbox by setting up SPF and DKIM on CentOS/RHEL server.
SPF and DKIM are two types of TXT records in DNS that can help with preventing email spoofing and making legitimate emails delivered into the recipient’s inbox instead of spam folder. If your domain is abused by email spoofing, then your emails are likely to landed in recipient’s spam folder if the recipient didn’t add you in address book.
SPF (Sender Policy Framework) record specifies which hosts or IP addresses are allowed to send emails on behalf of a domain. You should allow only your own email server or your ISP’s server to send emails for your domain.
DKIM (DomainKeys Identified Mail) uses a private key to add a signature to emails sent from your domain. Receiving SMTP servers verify the signature by using the corresponding public key, which is published in your domain’s DNS records.
In your DNS management interface, create a new TXT record like below.
TXT @ v=spf1 mx ~all

Where:
+all, -all, ?all, but they are rarely used.-all means that emails sent from not-allowed hosts should be rejected, never to land in the recipient’s inbox or spam folder. I have seen it used by facebook.com, but we generally don’t need such a strict policy.
Some folks might think that -all will be better as it will reject emails from untrusted hosts. Well, using -all in your SPF policy can cause your own emails to be rejected when the recipient has two SMTP servers and the main SMTP server goes offline, your emails will be temporarily stored on the backup SMTP server. When the main SMTP server comes back online, the email will be relayed from the backup SMTP server to the main SMTP server. Since you didn’t list the recipient’s backup SMTP server in your SPF policy, the email will be rejected by the recipient’s main SMTP server. So you should use ~all in your SPF policy.
Note that some DNS managers require you to wrap the SPF record with double-quotes like below.
TXT @ "v=spf1 mx ~all"
To check if your SPF record is propagated to the public Internet, you can use the dig utility on your Linux box like below. (On CentOS/RHEL, you need to install the bind-utils package in order to use the dig command: sudo dnf install bind-utils.)
dig your-domain.com txt
The txt option tells dig that we only want to query TXT records.
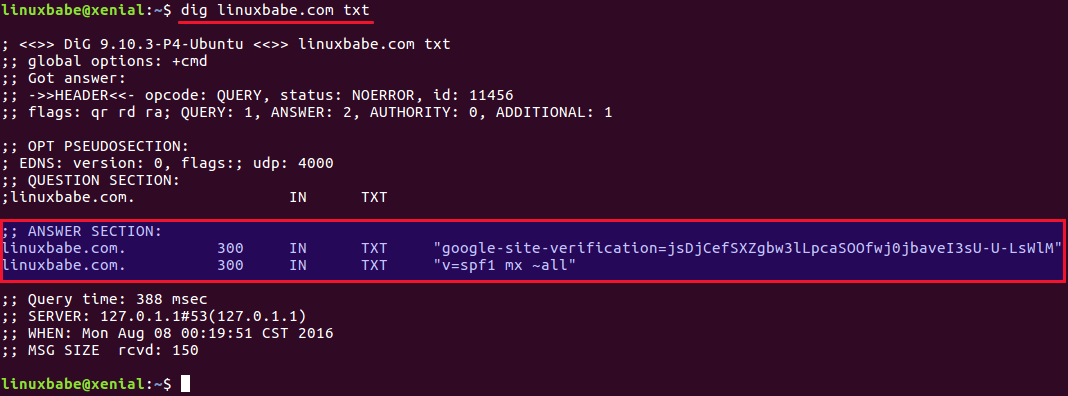
You can also use online SPF validator such as spf.myisp.ch to see which hosts are allowed to send emails for your domain and debug your SPF record if any error occurs. The dmarcian SPF surveyor can help test your SPF record syntax.
We also need to tell our Postfix SMTP server to check the SPF record of incoming emails to detect forged emails. First install required packages:
sudo dnf install epel-release

sudo dnf install pypolicyd-spf
Then add a user for policyd-spf.
sudo adduser policyd-spf --user-group --no-create-home -s /bin/false
Edit the Postfix master process configuration file.
sudo nano /etc/postfix/master.cf
Add the following lines at the end of the file, which tells Postfix to start the SPF policy daemon when it’s starting itself. Policyd-spf will run as the policyd-spf user.
policyd-spf  unix  -       n       n       -       0       spawn
    user=policyd-spf argv=/usr/libexec/postfix/policyd-spf
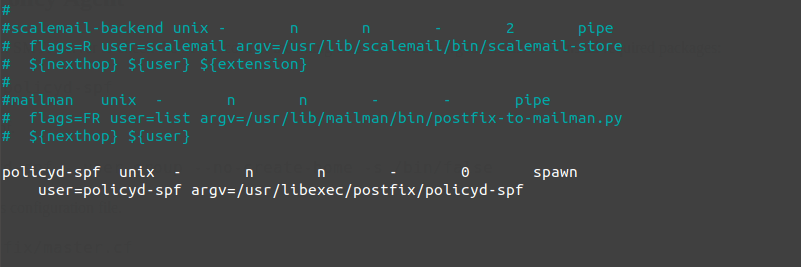
Note: You should not run policyd-spf in a chroot environment.
Save and close the file. Next, edit Postfix main configuration file.
sudo nano /etc/postfix/main.cf
Append the following lines at the end of the file. The first line specifies the Postfix policy agent timeout setting (for querying DNS). The following lines will impose restrictions on incoming emails by checking SPF record.
policyd-spf_time_limit = 3600
smtpd_recipient_restrictions =
   permit_mynetworks,
   permit_sasl_authenticated,
   reject_unauth_destination,
   check_policy_service unix:private/policyd-spf
Save and close the file. Then restart Postfix.
sudo systemctl restart postfix
Next time, when you receive an email from a domain that has an SPF record, you can see the SPF check results in the raw email header. The following header indicates the sender sent the email from an authorized host.
Received-SPF: Pass (mailfrom) identity=mailfrom;
Two common pieces of software that can do DKIM signing and verification on Linux are OpenDKIM and Amavis. We will use OpenDKIM because it’s lightweight and OpenDMARC doesn’t work with Amavis.
Install OpenDKIM from the EPEL (Extra Packages for Enterprise Linux) repository.
sudo dnf install epel-release

sudo dnf install opendkim perl-Getopt-Long
Edit OpenDKIM main configuration file.
sudo nano /etc/opendkim.conf
Find the following line.
Mode v
By default, OpenDKIM runs in verification mode (v), which will verify the DKIM signature of incoming email messages. We need to sign outgoing emails, so change this line to the following to enable signing mode.
Mode sv
Then find the following lines.
## Specifies whether or not the filter should generate report mail back
## to senders when verification fails and an address for such a purpose
## is provided. See opendkim.conf(5) for details.
SendReports yes

## Specifies the sending address to be used on From: headers of outgoing
## failure reports. By default, the e-mail address of the user executing
## the filter is used (executing_user@hostname).
# ReportAddress "Example.com Postmaster" <postmaster@example.com>
When a signature verification fails and the signature included a reporting request (“r=y”) and the signing domain advertises a reporting address (i.e. ra=user) in a reporting record in the DNS, OpenDKIM will send a structured report to that address containing details needed to reproduce the problem. You may want to use a particular From email address to send the report. Uncomment the ReportAddress parameter and change email address. Note that this will not create the backscatter problem, because report emails will sent to an email address specified in the sender domain’s DNS record.
Find the following line and comment it out, because we will use separate keys for each domain name.
KeyFile /etc/opendkim/keys/default.private
Next, find the following 4 lines and uncomment them.
# KeyTable            /etc/opendkim/KeyTable

# SigningTable        refile:/etc/opendkim/SigningTable

# ExternalIgnoreList  refile:/etc/opendkim/TrustedHosts

# InternalHosts       refile:/etc/opendkim/TrustedHosts
Save and close the file.
Edit the signing table file.
sudo nano /etc/opendkim/SigningTable
Add the following line at the end of this file. This tells OpenDKIM that if a sender on your server is using a @your-domain.com address, then it should be signed with the private key identified by 20200308._domainkey.your-domain.com.
*@your-domain.com 20200308._domainkey.your-domain.com
20200308 is the DKIM selector. A domain name might have multiple DKIM keys. The DKIM selector allows you to choose a particular DKIM key. You can use whatever name for the DKIM selector, but I found it’s convenient to use the current date (March 8, 2020) as the DKIM selector. Save and close the file. Then edit the key table file.
sudo nano /etc/opendkim/KeyTable
Add the following line, which specifies the location of the DKIM private key.
20200308._domainkey.your-domain.com your-domain.com:20200308:/etc/opendkim/keys/your-domain.com/20200308.private
Save and close the file. Next, edit the trusted hosts file.
sudo nano /etc/opendkim/TrustedHosts
127.0.0.0.1 and ::1 are included in this file by default. Now add the following line. This tells OpenDKIM that if an email is coming from your own domain name, then OpenDKIM should not perform DKIM verification on the email.
*.your-domain.com
Save and close the file.
Since DKIM is used to sign outgoing messages and verify incoming messages, you need to generate a private key to sign outgoing emails and a public key for receiving SMTP servers to verify the DKIM signature of your email. Public key will be published in DNS.
Create a separate folder for the domain.
sudo mkdir /etc/opendkim/keys/your-domain.com
Generate keys using opendkim-genkey tool.
sudo opendkim-genkey -b 2048 -d your-domain.com -D /etc/opendkim/keys/your-domain.com -s 20200308 -v
The above command will create 2048 bits keys. -d (domain) specifies the domain. -D (directory) specifies the directory where the keys will be stored. I use 20200308 as the DKIM selector. Once the command is executed, the private key will be written to 20200308.private file and the public key will be written to 20200308.txt file.

By default, only root can read and write to the key files. Make opendkim as the owner of the private key.
sudo chown opendkim:opendkim /etc/opendkim/keys/ -R
Display the public key
sudo cat /etc/opendkim/keys/your-domain.com/20200308.txt
The string after the p parameter is the public key.

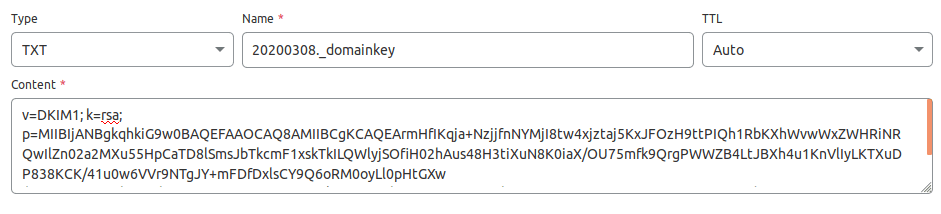
In you DNS manager, create a TXT record, enter 20200308._domainkey in the name field. (You need to replace 20200308 with your own DKIM selector.) Then go back to the terminal window, copy everything in the parentheses and paste it into the value field of the DNS record. You need to delete all double quotes and line breaks in the value field. If you don’t delete them, then key test in the next step will probably fail.
Enter the following command on your CentOS 8/RHEL 8 server to test your key.
sudo opendkim-testkey -d your-domain.com -s 20200308 -vvv
If everything is OK, you will see the key OK message.
opendkim-testkey: using default configfile /etc/opendkim.conf
opendkim-testkey: checking key '20200308._domainkey.linuxbabe.com'
opendkim-testkey: key OK
Note that your DKIM record may need sometime to propagate to the Internet. Depending on the domain registrar you use, your DNS record might be propagated instantly, or it might take up to 24 hours to propagate. You can go to https://www.dmarcanalyzer.com/dkim/dkim-check/, enter 20200308 as the selector and enter your domain name to check DKIM record propagation.
If you see “Key not secure”, don’t panic. This is because DNSSEC isn’t enabled on your domain name. DNSSEC is a security standard for secure DNS query. Most domain names haven’t enabled DNSSEC. You can continue to follow this guide.
Now we can start the opendkim service.
sudo systemctl start opendkim
And enable auto-start at boot time.
sudo systemctl enable opendkim
OpenDKIM listens on 127.0.0.1:8891.
Edit Postfix main configuration file.
sudo nano /etc/postfix/main.cf
Add the following lines at the end of this file, so Postfix will be able to call OpenDKIM via the milter protocol. Note that you should use 127.0.0.1 as the address. Don’t use localhost.
# Milter configuration
milter_default_action = accept
milter_protocol = 6
smtpd_milters = inet:127.0.0.1:8891
non_smtpd_milters = $smtpd_milters
Save and close the file. Then add postfix user to opendkim group.
sudo gpasswd -a postfix opendkim
Restart postfix service.
sudo systemctl restart postfix
You can now send a test email from your mail server to your Gmail account to see if SPF and DKIM checks are passed. On the right side of an opened email message in Gmail, if you click the show original button from the drop-down menu, you can see the authentication results.
If your message is not signed and DKIM check failed, you may want to check postfix log (/var/log/maillog) to see what’s wrong in your configuration. Your email server will also perform SPF and DKIM check on sender’s domain. You can see the results in the email headers. The following is SPF and DKIM check on a sender using Gmail.
Received-SPF: Pass (mailfrom) identity=mailfrom; client-ip=2607:f8b0:4864:20::c2d; helo=mail-yw1-xc2d.google.com; envelope-from=someone@gmail.com; receiver=<UNKNOWN>
Authentication-Results: mail.linuxbabe.com;
	dkim=pass (2048-bit key; unprotected) header.d=gmail.com header.i=@gmail.com header.b="XWMRd2co";
	dkim-atps=neutral
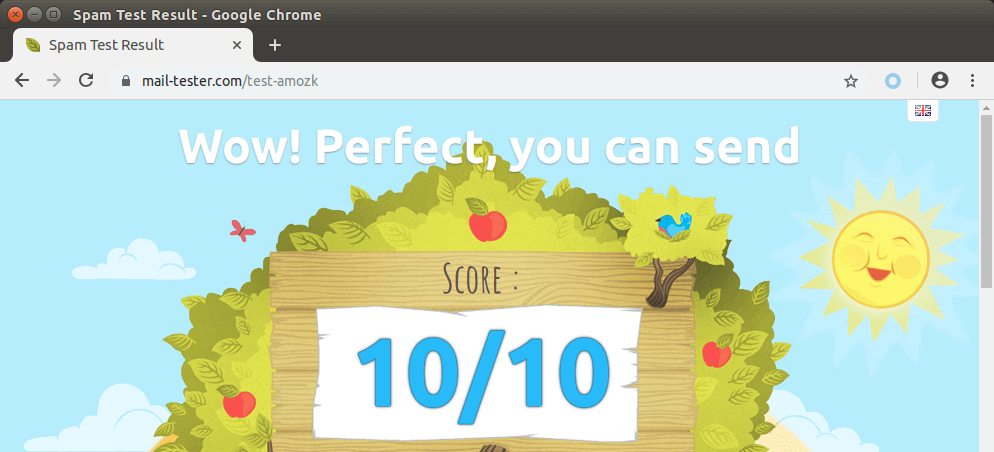
Now you can go to https://www.mail-tester.com. You will see a unique email address. Send an email from your domain to this address and then check your score. As you can see, I got a perfect score.
Mail-tester.com can only show you a sender score. There’s another service called GlockApps that allow you to check if your email is placed in the recipient’s inbox or spam folder, or rejected outright. It supports many popular email providers like Gmail, Outlook, Hotmail, YahooMail, iCloud mail, etc

Microsoft seems to be using an internal blacklist that block many legitimate IP addresses. If your emails are rejected by outlook or hotmail, you need to submit the sender information form. After that, your email will be accepted by outlook/hotmail, but may still be labeled as spam. In my test, the email landed in my Gmail inbox. However, it’s stilled labeled as spam in my outlook.com email although both SPF and DKIM are passed.
I have more tips for you in this article: How to stop your emails being marked as spam.
n previous articles, we discussed how to set up your own mail server on CentOS 8/RHEL 8 from scratch. In part 1 and part 2 of this tutorial series, we learned how to set up Postfix SMTP server and Dovecot IMAP server, but so far we can only have email addresses for users with local Unix account. This tutorial is going to show you how to create virtual mailboxes on CentOS 8/RHEL 8 mail server with PostfixAdmin, which is an open-source web-based interface to configure and manage a Postfix based email server for many domains and users.
With virtual mailboxes, we don’t need to create local Unix account for each email address. If you are going to set up a mail server for a company or organization, it’s always better to have an easy way to create virtual mailboxes in a web-based interface, which also allows users to change their passwords. That’s where PostfixAdmin comes in.
Note: Once you finish part 3, you can no longer use local Unix accounts as email addresses. You must create email addresses from the PostfixAdmin web interface.
I assume that you have followed part 1 and part 2 of this tutorial series. If you followed mail server tutorials on other websites, I recommend purging your configurations and start over with my tutorial series, so you are not going to be confused by different setup processes.
Once the above requirements are met, let’s install and configure PostfixAdmin.
PostfixAdmin is written in PHP and requires a database (MySQL/MariaDB, PostgreSQL or SQLite). This article will use MariaDB, which is a drop-in replacement for MySQL. It is developed by former members of MySQL team who are concerned that Oracle might turn MySQL into a closed-source product. Enter the following command to install MariaDB on CentOS 8/RHEL 8.
sudo dnf install mariadb-server mariadb -y
After it’s installed, we need to start it.
sudo systemctl start mariadb
Enable auto start at system boot time.
sudo systemctl enable mariadb
Check status:
systemctl status mariadb
output:
● mariadb.service - MariaDB 10.3 database server
   Loaded: loaded (/usr/lib/systemd/system/mariadb.service; enabled; vendor preset: disabled)
   Active: active (running) since Sat 2019-10-12 09:02:53 UTC; 33s ago
     Docs: man:mysqld(8)
           https://mariadb.com/kb/en/library/systemd/
 Main PID: 18608 (mysqld)
   Status: "Taking your SQL requests now..."
    Tasks: 30 (limit: 5092)
   Memory: 77.0M
   CGroup: /system.slice/mariadb.service
           └─18608 /usr/libexec/mysqld --basedir=/usr
“Enabled” indicates that auto start at boot time is enabled and we can see that MariaDB server is running. Now we need to run the security script.
sudo mysql_secure_installation
When it asks you to enter MariaDB root password, press Enter key as the root password isn’t set yet. Then enter y to set the root password for MariaDB server.
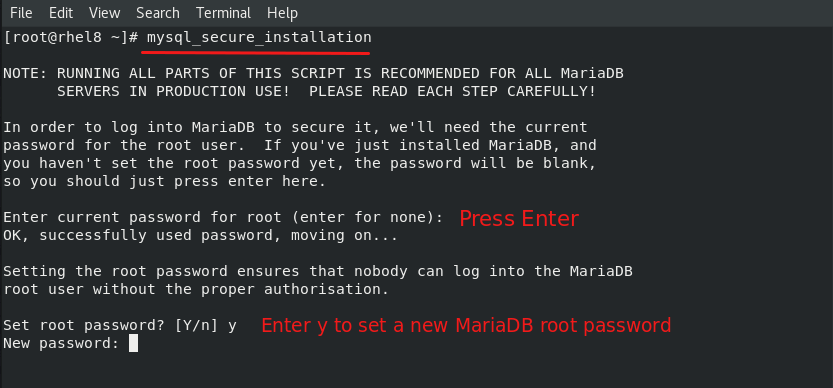
Next, you can press Enter to answer all remaining questions, which will remove anonymous user, disable remote root login and remove test database. This step is a basic requirement for MariaDB database security. (Note that the letter Y is capitalized, which means it’s the default answer.)
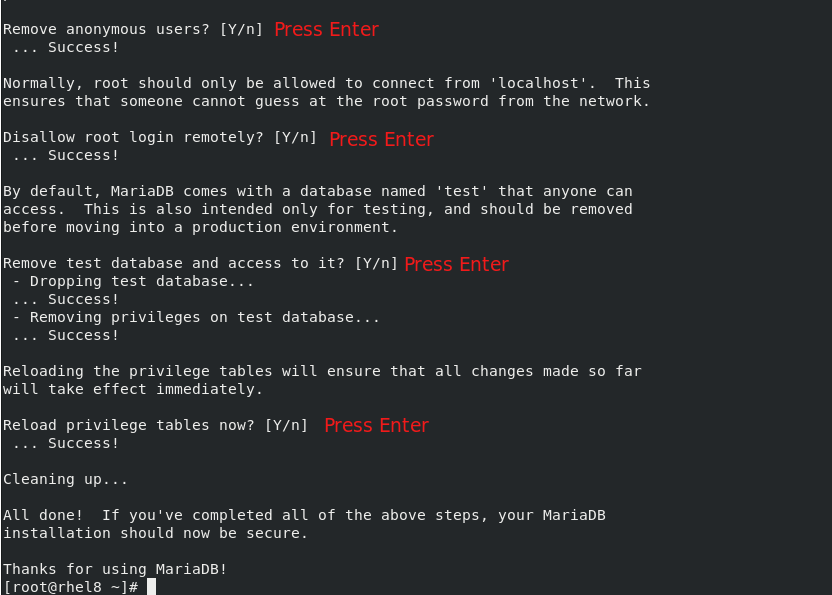
Log into your mail server, then download PostfixAdmin install file onto your server. Go to PostfixAdmin Gitbub page to download the latest version. You can use the wget tool to download it from command line. The download link is always available in the format below. If a new version comes out, simply replace 3.3.8 with the new version number.
sudo dnf install wget

wget https://github.com/postfixadmin/postfixadmin/archive/postfixadmin-3.3.8.tar.gz
Once downloaded, extract the archive.
If you are using Apache, then extract it to /var/www/ directory and rename it to postfixadmin.
sudo dnf install tar
sudo tar xvf postfixadmin-3.3.8.tar.gz -C /var/www/
sudo mv /var/www/postfixadmin-postfixadmin-3.3.8 /var/www/postfixadmin
If you are using Nginx, extract it to /usr/share/nginx/ directory and rename it to postfixadmin.
sudo dnf install tar
sudo tar xvf postfixadmin-3.3.8.tar.gz -C /usr/share/nginx/
sudo mv /usr/share/nginx/postfixadmin-postfixadmin-3.3.8 /usr/share/nginx/postfixadmin
PostfixAdmin requires a templates_c directory, and the web server needs read and write access to this directory. We also need to change the SELinux context to make it writable. So run the following commands.
Apache
sudo mkdir /var/www/postfixadmin/templates_c
sudo setfacl -R -m u:apache:rwx /var/www/postfixadmin/templates_c/
sudo chcon -t httpd_sys_rw_content_t /var/www/postfixadmin/templates_c/ -R
Nginx
sudo mkdir /usr/share/nginx/postfixadmin/templates_c
sudo setfacl -R -m u:nginx:rwx /usr/share/nginx/postfixadmin/templates_c/
sudo chcon -t httpd_sys_rw_content_t /usr/share/nginx/postfixadmin/templates_c/ -R
By default, SELinux forbids Apache/Nginx to make network requests to other servers, but later Apache/Nginx needs to request TLS certificate status from Let’s Encrypt CA server for OCSP stapling, so we need to tell SELinux to allow Apache/Nginx with the following command.
sudo setsebool -P httpd_can_network_connect 1
If you use Nginx, then you also need to run the following command to give the nginx user read and write permissions to 3 directories.
sudo setfacl -R -m u:nginx:rwx /var/lib/php/opcache/ /var/lib/php/session/ /var/lib/php/wsdlcache/
Restart Apache/Nginx.
sudo systemctl restart httpd

sudo systemctl restart nginx
Starting with Dovecot 2.3.11, the web server user needs permission to read Let’s Encrypt TLS certificate in order to do password hashing. Run the following two commands to grant permissions.
Apache
sudo setfacl -R -m u:apache:rx /etc/letsencrypt/live/ /etc/letsencrypt/archive/
Nginx
sudo setfacl -R -m u:nginx:rx /etc/letsencrypt/live/ /etc/letsencrypt/archive/
Log into MySQL/MariaDB shell as root with the following command. You will need to enter the MySQL/MariaDB root password.
mysql -u root -p
Once you are logged in, create a database for PostfixAdmin using the following command. I named it postfixadmin, but you can use whatever name you like. (Don’t leave out the semicolon.)
create database postfixadmin;
Then enter the command below to create a database user for PostfixAdmin. This command also grant all privileges of postfixadmin database to the user. Replace postfixadmin_password with your preferred password. Note that the password should not contain the # character, or you might not be able to log in later.
grant all privileges on postfixadmin.* to 'postfixadmin'@'localhost' identified by 'postfixadmin_password';
Flush the privileges table for the changes to take effect and then get out of MariaDB shell.
flush privileges;

exit;
The default PostfixAdmin configuration file is config.inc.php. We need to create a config.local.php file and add custom configurations.
Apache
sudo nano /var/www/postfixadmin/config.local.php
Nginx
sudo nano /usr/share/nginx/postfixadmin/config.local.php
Add the following lines in the file, so PostfixAdmin can connect to MySQL/MariaDB database. Replace postfixadmin_password with the real PostfixAdmin password created in step 4.
<?php
$CONF['configured'] = true;
$CONF['database_type'] = 'mysqli';
$CONF['database_host'] = 'localhost';
$CONF['database_port'] = '3306';
$CONF['database_user'] = 'postfixadmin';
$CONF['database_password'] = 'postfixadmin_password';
$CONF['database_name'] = 'postfixadmin';
$CONF['encrypt'] = 'dovecot:BLF-CRYPT';
$CONF['dovecotpw'] = "/usr/bin/doveadm pw -r 12";
Save and close the file. Note that we will use the BLF-CRYPT password scheme.
If you use Apache web server, create a virtual host for PostfixAdmin.
sudo nano /etc/httpd/conf.d/postfixadmin.conf
Put the following text into the file. Replace postfixadmin.example.com with your real domain name and don’t forget to set DNS A record for it.
<VirtualHost *:80>
  ServerName postfixadmin.example.com
  DocumentRoot /var/www/postfixadmin/public/

  ErrorLog /var/log/httpd/postfixadmin_error.log
  CustomLog /var/log/httpd/postfixadmin_access.log combined

  <Directory />
    Options FollowSymLinks
    AllowOverride All
  </Directory>

  <Directory /var/www/postfixadmin/public/>
    Options FollowSymLinks MultiViews
    AllowOverride All
    Order allow,deny
    allow from all
  </Directory>

</VirtualHost>
Save and close the file. Reload Apache for the changes to take effect.
sudo systemctl reload httpd
Now you should be able to see the PostfixAdmin web-based install wizard at http://postfixadmin.example.com/setup.php.
If you use Nginx web server, create a virtual host for PostfixAdmin.
sudo nano /etc/nginx/conf.d/postfixadmin.conf
Put the following text into the file. Replace postfixadmin.example.com with your real domain name and don’t forget to set DNS A record for it.
server {
   listen 80;
   listen [::]:80;
   server_name postfixadmin.example.com;

   root /usr/share/nginx/postfixadmin/public/;
   index index.php index.html;

   access_log /var/log/nginx/postfixadmin_access.log;
   error_log /var/log/nginx/postfixadmin_error.log;

   location / {
       try_files $uri $uri/ /index.php;
   }

   location ~ ^/(.+\.php)$ {
        try_files $uri =404;
        fastcgi_pass unix:/run/php-fpm/www.sock;
        fastcgi_index index.php;
        fastcgi_param SCRIPT_FILENAME $document_root$fastcgi_script_name;
        include /etc/nginx/fastcgi_params;
   }
}
Save and close the file. Then test Nginx configuration.
sudo nginx -t
If the test is successful, reload Nginx for the changes to take effect.
sudo systemctl reload nginx
Now you should be able to see the PostfixAdmin web-based install wizard at http://postfixadmin.example.com/setup.php.
PostfixAdmin requires the php-imap module to create subfolders in mailboxes, but php-imap isn’t included in the default CentOS 8/RHEL 8 repository, so we need to use the Remi repo to install this PHP module.
Install the Remi Repo.
sudo dnf install -y https://rpms.remirepo.net/enterprise/remi-release-8.rpm
Then reset PHP module streams.
sudo dnf module reset php
Enable the php:remi-7.4 module stream.
sudo dnf module enable php:remi-7.4 -y
Then you can run the following command to install PHP modules required or recommended by PostfixAdmin.
sudo dnf install -y php-fpm php-imap php-mbstring php-mysqlnd php-gd php-opcache php-json php-curl php-zip php-xml php-bz2 php-intl php-gmp
We need to run the following command to tell SELinux to allow Apache to execute PHP code via PHP-FPM.
sudo setsebool -P httpd_execmem 1
If you use Nginx, edit the PHP-FPM config file:
nano /etc/php-fpm.d/www.conf
By default, PHP-FPM runs as the apache user. Since you are using Nginx web server, we need to change it. Find the following two lines.
user = apache
group = apache
Change them to
user = nginx
group = nginx
Save and close the file. Then start PHP-FPM.
sudo systemctl start php-fpm
Enable auto start at system boot time.
sudo systemctl enable php-fpm
Restart Apache or Nginx.
sudo systemctl restart httpd

sudo systemctl restart nginx
To encrypt the HTTP traffic, we can enable HTTPS by installing a free TLS certificate issued from Let’s Encrypt.
If you use Apache, run this command to obtain and install TLS certificate.
sudo certbot --apache --agree-tos --redirect --hsts --staple-ocsp --email you@example.com -d postfixadmin.example.com
If you use Nginx, run the following command to obtain and install TLS certificate.
sudo certbot --nginx --agree-tos --redirect --hsts --staple-ocsp --email you@example.com -d postfixadmin.example.com
Where:
--apache: Use the Apache plugin.--nginx: Use the nginx plugin.--agree-tos: Agree to terms of service.--redirect: Force HTTPS by 301 redirect.--hsts: Add the Strict-Transport-Security header to every HTTP response. Forcing browser to always use TLS for the domain. Defends against SSL/TLS Stripping.--staple-ocsp: Enables OCSP Stapling. A valid OCSP response is stapled to the certificate that the server offers during TLS.--email: Email used for registration and recovery contact.-d flag is followed by a list of domain names, separated by comma. You can add up to 100 domain names.The certificate should now be obtained and automatically installed, which is indicated by the messages below.
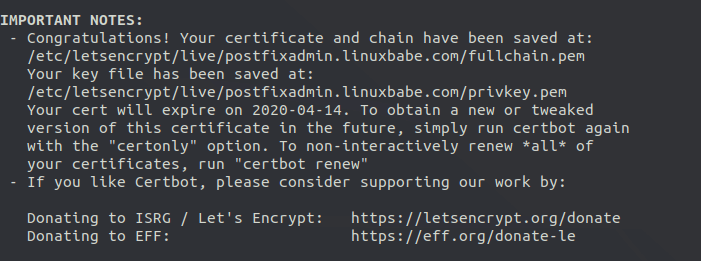
During installation, PostfixAdmin needs to read the Dovecot configuration files in order to create password. By default, SELinux doesn’t allow the web server to read Dovecot configuration files. We need to create a custom SELinux policy to allow this action.
Install required packages.
sudo dnf install binutils rpm-build setools-console policycoreutils-python3 policycoreutils-devel
Generate a custom policy for httpd. (If you use Nginx, replace httpd with nginx.)
sudo sepolicy generate --init /usr/sbin/httpd
Edit the type enforcement file.
sudo nano httpd.te
Add the following line at the end of this file, so Apache/Nginx will be able to read Dovecot configuration files.
dovecot_read_config(httpd_t)
Save and close the file. Then install the new SELinux policy.
sudo ./httpd.sh
Now Apache/Nginx should be able to read Dovecot configuration files.
If you don’t know what to add to the httpd.te file, run the following command after a SELinux denial happens.
sudo ausearch -m AVC -ts recent | audit2allow -R
audit2allow will suggest changes.
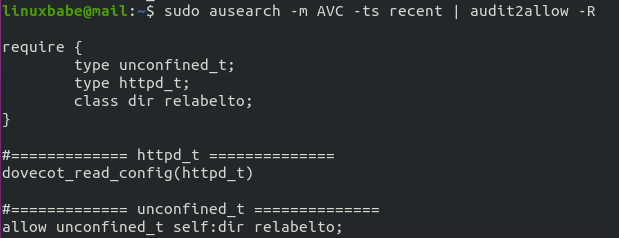
PostfixAdmin needs to read Dovecot statistics. Edit the Dovecot configuration file.
sudo nano /etc/dovecot/conf.d/10-master.conf
Add the following lines to the end of this file. If you use Nginx, change apache to nginx.
service stats {
    unix_listener stats-reader {
    user = apache
    group = apache
    mode = 0660
}

unix_listener stats-writer {
    user = apache
    group = apache
    mode = 0660
  }
}
Save and close the file. Then add the web server to the dovecot group.
Apache
sudo gpasswd -a apache dovecot
NGinx
sudo gpasswd -a nginx dovecot
Restart Dovecot.
sudo systemctl restart dovecot
Go to postfixadmin.example.com/setup.php to run the web-based setup wizard. First, you need to create a setup password for PostfixAdmin.
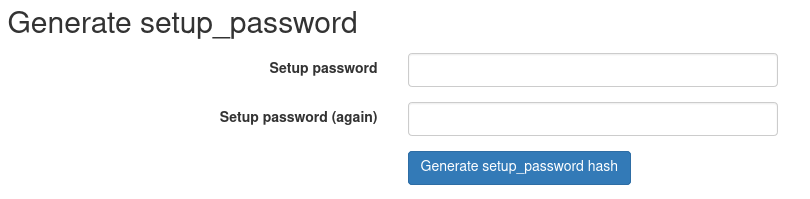
After creating the password hash, PostfixAdmin will display a line like below.
$CONF['setup_password'] = 'db1b019982a6ba878bdc6bd923bef03e:4e29fdd341b570364064a5ad69652f3d8bee0bb4';
You need to open the config.local.php file.
Apache
sudo nano /var/www/postfixadmin/config.local.php
Nginx
sudo nano /usr/share/nginx/postfixadmin/config.local.php
Add the line display on PostfixAdmin setup page to the end of the file like below.
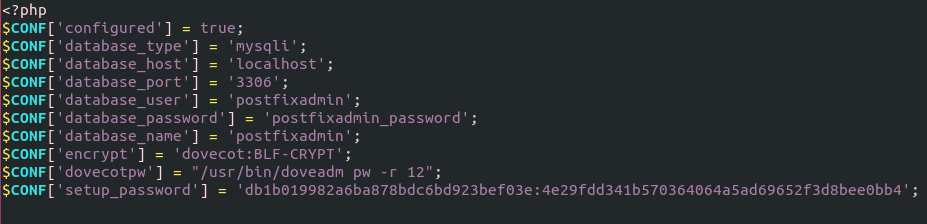
After saving the file, you need to refresh the PostfixAdmin setup page and enter the setup password again, then create the admin account.
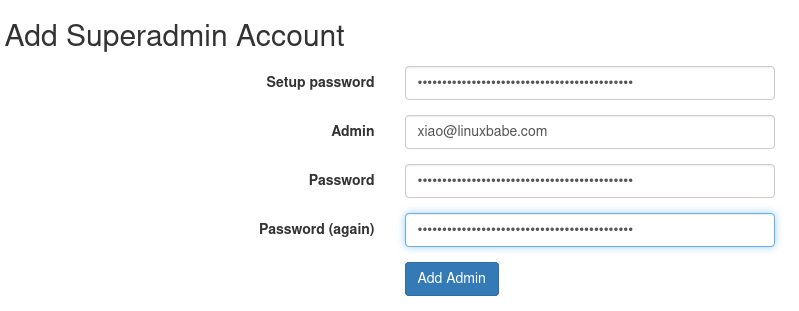
Once the superadmin account is created, you can log into PostfixAdmin at postfixadmin.example.com/login.php.

If you see the following error when trying to create a superadmin account,
can’t encrypt password with dovecotpw, see error log for details
It’s because the web server user doesn’t have permission to read Let’s Encrypt TLS certificate. To fix it, run the following two commands to grant permissions.
Apache
sudo setfacl -R -m u:apache:rx /etc/letsencrypt/live/
sudo setfacl -R -m u:apache:rx /etc/letsencrypt/archive/
Nginx
sudo setfacl -R -m u:nginx:rx /etc/letsencrypt/live/
sudo setfacl -R -m u:nginx:rx /etc/letsencrypt/archive/
If you see the following error,
Invalid query: Specified key was too long; max key length is 1000 bytes
Then you need to log in to MySQL/MariaDB database server as root from command line,
mysql -u root -p
and change the default collation from utf8mb4_general_ci to utf8_general_ci.
MariaDB [(none)]> alter database postfixadmin collate ='utf8_general_ci';
Exit MySQL/MariaDB console and reload the setup.php page.
By default, Postfix delivers emails only to users with a local Unix account. To make it deliver emails to virtual users whose information is stored in the database, we need to configure Postfix to use virtual mailbox domains.
First, we need to add MySQL map support for Postfix by installing the postfix-mysql package.
sudo dnf install postfix-mysql
Then edit the Postfix main configuration file.
sudo nano /etc/postfix/main.cf
Add the following lines at the end of this file. (In Nano text editor, you can press Ctrl+W, then Ctrl+V to jump to the end of a file.)
virtual_mailbox_domains = proxy:mysql:/etc/postfix/sql/mysql_virtual_domains_maps.cf
virtual_mailbox_maps =
   proxy:mysql:/etc/postfix/sql/mysql_virtual_mailbox_maps.cf,
   proxy:mysql:/etc/postfix/sql/mysql_virtual_alias_domain_mailbox_maps.cf
virtual_alias_maps =
   proxy:mysql:/etc/postfix/sql/mysql_virtual_alias_maps.cf,
   proxy:mysql:/etc/postfix/sql/mysql_virtual_alias_domain_maps.cf,
   proxy:mysql:/etc/postfix/sql/mysql_virtual_alias_domain_catchall_maps.cf
Where:
virtual_mailbox_domains points to a file that will tell Postfix how to look up domain information from the database.virtual_mailbox_maps points to files that will tell Postfix how to look up email addresses from the database.virtual_alias_maps points to files that will tell Postfix how to look up aliases from the database.We want to use dovecot to deliver incoming emails to the virtual users’ message store, so also add the following line at the end of this file.
virtual_transport = lmtp:unix:private/dovecot-lmtp
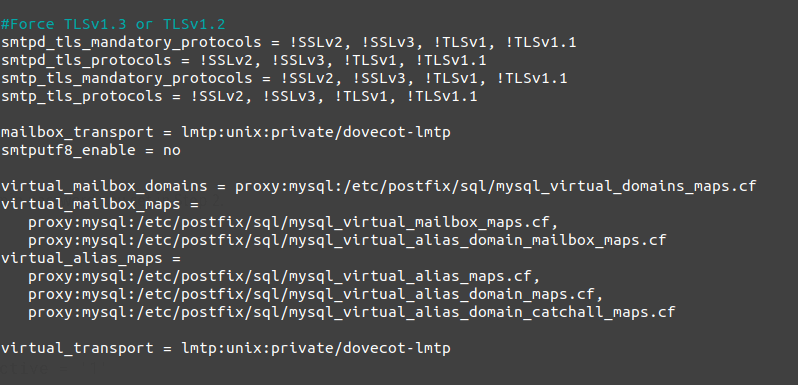
Save and close the file. Next, we need to create the .cf files one by one. Create the sql directory.
sudo mkdir /etc/postfix/sql/
Create the mysql_virtual_domains_maps.cf file.
sudo nano /etc/postfix/sql/mysql_virtual_domains_maps.cf
Add the following content. Replace postfixadmin_password with the postfixadmin password you set in Step 4.
user = postfixadmin
password = postfixadmin_password
hosts = localhost
dbname = postfixadmin
query = SELECT domain FROM domain WHERE domain='%s' AND active = '1'
#query = SELECT domain FROM domain WHERE domain='%s'
#optional query to use when relaying for backup MX
#query = SELECT domain FROM domain WHERE domain='%s' AND backupmx = '0' AND active = '1'
#expansion_limit = 100
Create the mysql_virtual_mailbox_maps.cf file.
sudo nano /etc/postfix/sql/mysql_virtual_mailbox_maps.cf
Add the following content.
user = postfixadmin
password = postfixadmin_password
hosts = localhost
dbname = postfixadmin
query = SELECT maildir FROM mailbox WHERE username='%s' AND active = '1'
#expansion_limit = 100
Create the mysql_virtual_alias_domain_mailbox_maps.cf file.
sudo nano /etc/postfix/sql/mysql_virtual_alias_domain_mailbox_maps.cf
Add the following content.
user = postfixadmin
password = postfixadmin_password
hosts = localhost
dbname = postfixadmin
query = SELECT maildir FROM mailbox,alias_domain WHERE alias_domain.alias_domain = '%d' and mailbox.username = CONCAT('%u', '@', alias_domain.target_domain) AND mailbox.active = 1 AND alias_domain.active='1'
Create the mysql_virtual_alias_maps.cf file.
sudo nano /etc/postfix/sql/mysql_virtual_alias_maps.cf
Add the following content.
user = postfixadmin
password = postfixadmin_password
hosts = localhost
dbname = postfixadmin
query = SELECT goto FROM alias WHERE address='%s' AND active = '1'
#expansion_limit = 100
Create the mysql_virtual_alias_domain_maps.cf file.
sudo nano /etc/postfix/sql/mysql_virtual_alias_domain_maps.cf
Add the following content.
user = postfixadmin
password = postfixadmin_password
hosts = localhost
dbname = postfixadmin
query = SELECT goto FROM alias,alias_domain WHERE alias_domain.alias_domain = '%d' and alias.address = CONCAT('%u', '@', alias_domain.target_domain) AND alias.active = 1 AND alias_domain.active='1'
Create the mysql_virtual_alias_domain_catchall_maps file.
sudo nano /etc/postfix/sql/mysql_virtual_alias_domain_catchall_maps.cf
Add the following content.
# handles catch-all settings of target-domain
user = postfixadmin
password = postfixadmin_password
hosts = localhost
dbname = postfixadmin
query = SELECT goto FROM alias,alias_domain WHERE alias_domain.alias_domain = '%d' and alias.address = CONCAT('@', alias_domain.target_domain) AND alias.active = 1 AND alias_domain.active='1'
Since the database passwords are stored in plain text so they should be readable only by user postfix and root, which is done by executing the following two commands.
sudo chmod 0640 /etc/postfix/sql/*
sudo setfacl -R -m u:postfix:rx /etc/postfix/sql/
Next, we need to change the value of the mydestination parameter in Postfix. Display the current value:
postconf mydestination
Sample output:
mydestination = linuxbabe.com, $myhostname, localhost.$mydomain, localhost
The mydestination parameter contains a list of domain names that will receive emails delivered to local Unix accounts. In part 1, we added the apex domain name (like linuxbabe.com) to mydestination. Since we are going to use virtual mailbox, we need to remove the apex domain name from the list by issuing the following command.
sudo postconf -e "mydestination = \$myhostname, localhost.\$mydomain, localhost"
Now let’s open the Postfix main configuration file again.
sudo nano /etc/postfix/main.cf
Add the following lines at the end of this file.
virtual_mailbox_base = /var/vmail
virtual_minimum_uid = 2000
virtual_uid_maps = static:2000
virtual_gid_maps = static:2000
The first line defines the base location of mail files. The remaining 3 lines define which user ID and group ID Postfix will use when delivering incoming emails to the mailbox. We use the user ID 2000 and group ID 2000.
Save and close the file. Restart Postfix for the changes to take effect.
sudo systemctl restart postfix
Next, we need to create a user named vmail with ID 2000 and a group with ID 2000.
sudo adduser vmail --system --uid 2000 --user-group --no-create-home
Create the mail base location.
sudo mkdir /var/vmail/
Make vmail as the owner.
sudo chown vmail:vmail /var/vmail/ -R
We also need to change the SELinux context to make it writable.
sudo chcon -t mail_spool_t /var/vmail/ -R
We also need to configure the Dovecot IMAP server to query user information from the database. First, run the following command to add MySQL support for Dovecot.
sudo dnf install dovecot-mysql
Then edit the 10-mail.conf file.
sudo nano /etc/dovecot/conf.d/10-mail.conf
In part 2, we used the following mail_location. Email messages are stored under the Maildir directory under each user’s home directory.
mail_location = maildir:~/Maildir
Since we are using virtual mailbox domain now, we need to enable mail_home for the virtual users by adding the following line in the file, because virtual users don’t have home directories by default.
mail_home = /var/vmail/%d/%n
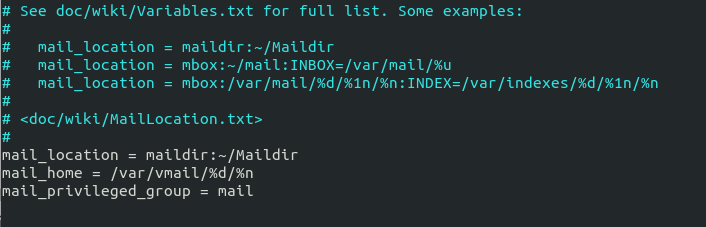
Save and close the file. Then edit the 10-auth.conf file.
sudo nano /etc/dovecot/conf.d/10-auth.conf
In part 2, we used the following value for auth_username_format.
auth_username_format = %n
The %n would drop away the domain if it was given. Because in part 2 we were using local Unix account for the username of every email address, we must use %n to drop away the domain, so users were able to login with the full email address.
Now we are using virtual mailbox domains, which means the username of every email address includes the domain part, so we need to change the auth_username_format as follows. %u won’t drop away the domain. This allows users to login with the full email address.
auth_username_format = %u
Uncomment the following line at the end of the file, so Dovecot can query user information from the database.
!include auth-sql.conf.ext
Now you probably don’t want local Unix users to send emails without registering email addresses in PostfixAdmin, then comment out the following line by adding the # character at the beginning, so Dovecot won’t query the local /etc/passwd or /etc/shadow file.
#!include auth-system.conf.ext
It can be helpful to add the following two lines in this file to debug login issues. The login errors would be logged into /var/log/maillog file. (Once users can login without problems, you can comment out the following two lines.)
auth_debug = yes
auth_debug_passwords = yes
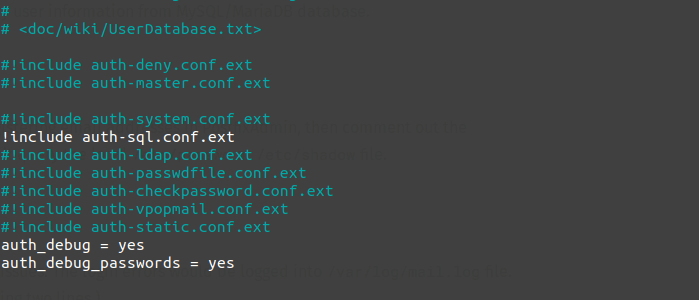
Save and close the file.
Create the dovecot-sql.conf.ext file.
sudo nano /etc/dovecot/dovecot-sql.conf.ext
Here is the content that you should have. Replace postfixadmin_password with the postfixadmin password you set in Step 4.
driver = mysql

connect = host=localhost dbname=postfixadmin user=postfixadmin password=postfixadmin_password

default_pass_scheme = BLF-CRYPT

password_query = SELECT username AS user,password FROM mailbox WHERE username = '%u' AND active='1'

user_query = SELECT maildir, 2000 AS uid, 2000 AS gid FROM mailbox WHERE username = '%u' AND active='1'

iterate_query = SELECT username AS user FROM mailbox
Save and close the file. And restart Dovecot.
sudo systemctl restart dovecot
When a user tries to log in, Dovecot would generate an BLF-CRYPT hash from the password entered by the user, then compare it with the password hash stored in the database.
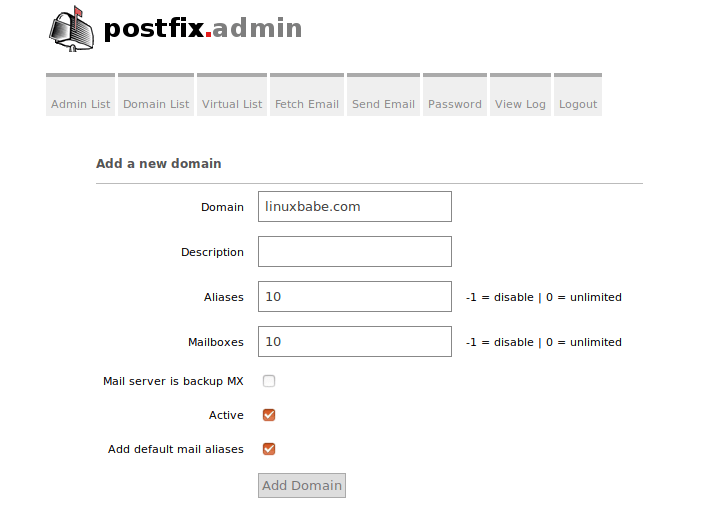
Log in to PostfixAdmin web interface as the admin. Click the Domain List tab and select New Domain to add a domain. You can choose how many aliases and mailboxes are allowed for this domain.
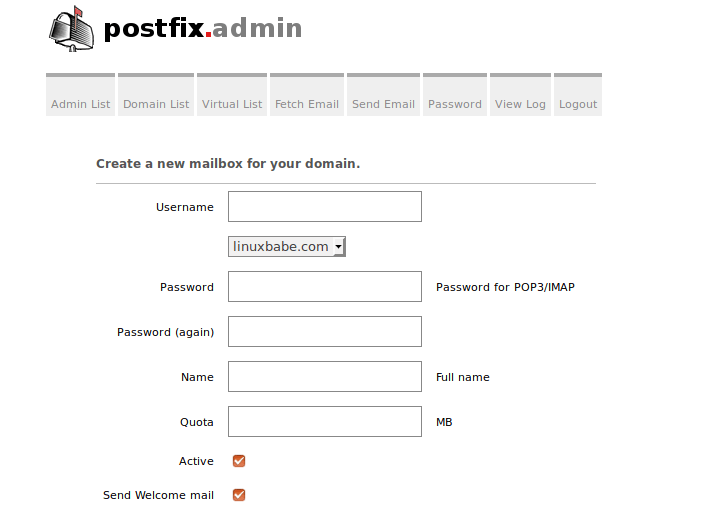
Then click Virtual List tab and select Add Mailbox to add a new email address for your domain.
Now fire up your desktop email client such as Mozilla Thunderbird and add a mail account. If Thunderbird found your mail server configuration like below, simply click Done button and you will be able to read and send emails.

If Thunderbird didn’t found your mail server configuration, then click Manual config button to enter your mail server details.
mail.your-domain.com as the server name, choose port 143 and STARTTLS. Choose normal password as the authentication method.mail.your-domain.com as the server name, choose port 587 and STARTTLS. Choose normal password as the authentication method.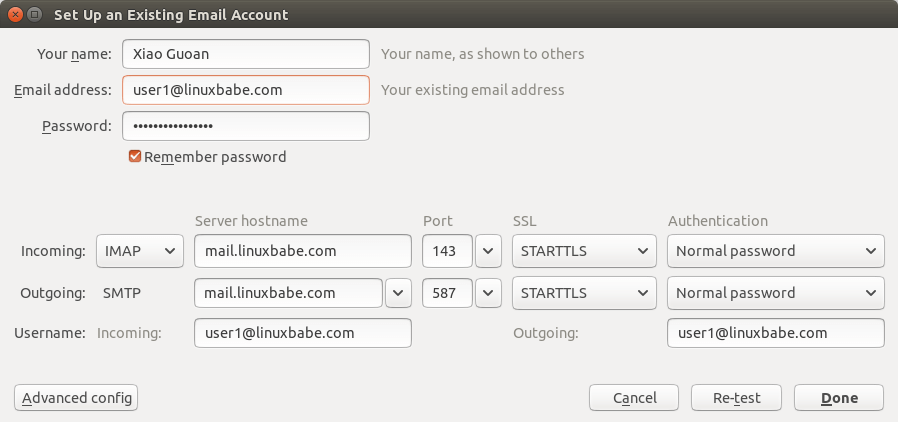
Hint: You can also use port 993 with SSL/TLS encryption for IMAP, and use port 465 with SSL/TLS encryption for SMTP. You should not use port 25 as the SMTP port in mail clients to submit outgoing emails.
You should now be able to connect to your own email server and also send and receive emails with your desktop email client!
As a rule of thumb, you should always check the mail log (/var/log/maillog) on your mail server when an error happens. The following is a list of specific errors and troubleshooting tips.
If you can’t log into your mail server from a desktop mail client, scan your mail server to find if the ports are open. Note that you should run the following command from another Linux computer or server. If you run it on your mail server, then the ports will always appear to be open.
sudo nmap mail.your-domain.com
And check if Dovecot is running.
systemctl status dovecot
You can also check the mail log (/var/log/maillog), which may give you some clues. If Dovecot fails to start, the error might not be logged to the /var/log/maillog file, you can run the following command to see what’s wrong.
sudo journalctl -eu dovecot
If you see the following error in the mail log, it’s likely that you didn’t set a correct password in the .cf files under /etc/postfix/sql/ directory.
postfix/trivial-rewrite[28494]: warning: virtual_alias_domains: proxy:mysql:/etc/postfix/sql/mysql_virtual_alias_maps.cf: table lookup problem
postfix/trivial-rewrite[28494]: warning: virtual_alias_domains lookup failure
If you see the following error in the mail log, it’s because you forgot to add mail_location = maildir:~/Maildir in the /etc/dovecot/conf.d/10-mail.conf file.
open(/var/mail/username@domain.com) failed: Permission denied (euid=2000(vmail) egid=2000(vmail) missing +w perm: /var/mail, we're not in group 8(mail), dir owned by 0:8 mode=0775
As I said in part 1, if you use Cloudflare DNS service, you should not enable the CDN (proxy) feature when creating DNS A record and AAAA record for the hostname of your mail server. Cloudflare doesn’t support SMTP or IMAP proxy.
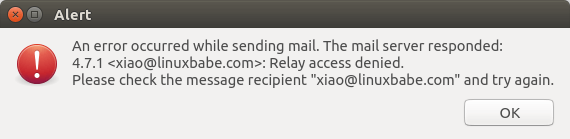
If you see the “relay access denied” error when trying to send emails from a mail client, it’s most likely that you use port 25 as the SMTP port in your mail client. As I said a while ago, you should use port 587 or 465 as the SMTP port in mail clients (Mozilla Thunberbird, Microsoft Outlook, etc) to submit outgoing emails. Port 25 should be used for SMTP server to SMTP server communications.
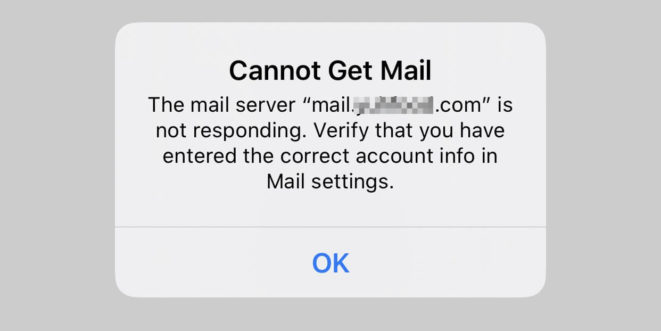
If you use the iOS Mail app to log into your mail server and encounter the following error.
You can try to fix it by enforcing SSL encryption, for both SMTP and IMAP.
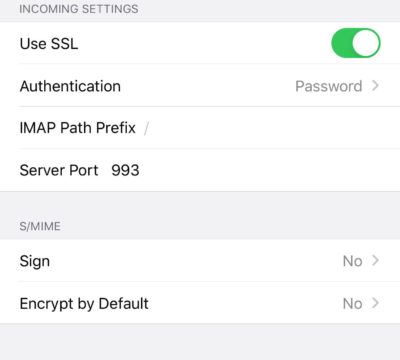
Fun fact: It seems the iOS Mail app has difficulty in supporting STARTTLS on IMAP port 143, but it supports STARTTLS on the submission port 587.
Users can log into PostfixAdmin at https://postfixadmin.example.com/users/login.php, then change their passwords.
To delete emails in Junk folder for all users, you can run
sudo doveadm expunge -u *@example.com mailbox Junk all
To delete emails in Trash folder for all users, run
sudo doveadm expunge -u *@example.com mailbox Trash all
I think it’s better to clean emails that have been in the Junk or Trash folder for more than 2 weeks, instead of cleaning all emails.
sudo doveadm expunge -u *@example.com mailbox Junk savedbefore 2w
Then add a cron job to automate the job.
sudo crontab -e
Add the following line to clean Junk and Trash folder every day
@daily doveadm expunge -u *@example.com mailbox Junk savedbefore 2w;doveadm expunge -u *@example.com mailbox Trash savedbefore 2w
By default, any local user can use the sendmail binary to submit outgoing emails. Now that your mail server is using virtual mailboxes, you might want to restrict access to the sendmail binary to trusted local users only, so a malicious user can’t use it to send a large volume of emails to damage your mail server’s reputation. Edit the Postfix main configuration file.
sudo nano /etc/postfix/main.cf
Add the following line to the end of this file, so only the root and www-data user can submit emails via sendmail. You can also add other usernames.
authorized_submit_users = root,www-data
Save and close the file. Then restart Postfix.
sudo systemctl restart postfix

